Editing an Exposure-Bracketed Photo
- Mike Page
- Aug 25, 2022
- 4 min read

Waking up in the Montafon region of western Austria a couple of weeks back I realised that it was 34 years to the day that I'd fallen in love with the Alps during a year in Switzerland. After three stunning days we had rain overnight on the last day, causing us to abandon the higher slopes for a valley-bottom hike up a series of waterfalls. Walking up along a well-laid path through the forest we came upon this delightful section of path curving between the trees and I knew that there was an image here for the taking.
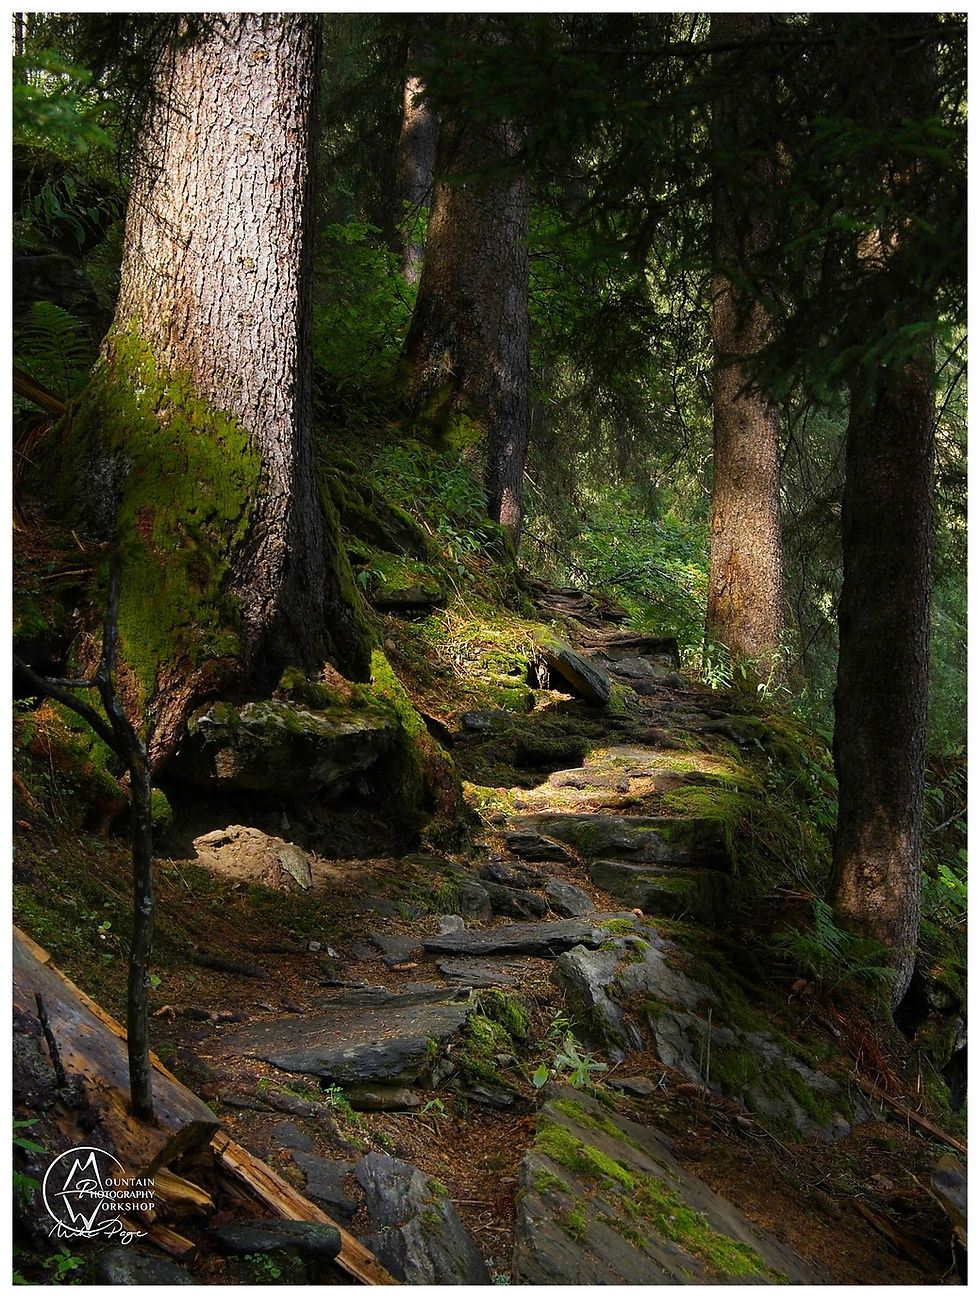
The overnight rain had dissipated giving way to strong sunlight and I realised that in order to catch the full dynamic range of the scene I was going to have to exposure bracket, i.e. take a number of exposures that would accommodate both the darkest and brightest parts of the scene and then assemble these in the digital darkroom. Fortunately such a bracketed image is relatively easy to do on the Olympus. Actually with the way I've set mine up, it's literally a matter of tapping a button, and I'll get a series of three images when I hit the shutter release, one at the standard exposure, one 2 stops (4x) darker and one 2 stops lighter. I can also see immediately on the Olympus when I'll need to engage exposure bracketing because it shows me areas that are over- or underexposed with the current settings in the viewfinder.

So these are the three starting images, one exposed for the tree, one for the majority of the scene and one for the darker path. A close look at the central exposure shows that whilst the path actually well exposed, the tree to the left is blown out.
Many photographers edit their photos in Lightroom and/or Photoshop, but I'm a self-confessed Adobophobe due to their subscription-style purchasing options. I probably pay as much for ON1 Photo Raw 2022 as I would in subscriptions, but if I stop updating, I'd still have access to the last version of the software that I bought. Call me old-fashioned, but once I buy something, I like to have the right to use it as I want. Regardless, all of these steps have equivalents in most standard digital darkrooms.
'But how do you combine these three exposures to arrive at the final image?' I hear you ask. There are essentially two ways of doing this, one would be to create an HDR (high dynamic range) image. I've done that below. It corrects the darkest and lightest parts of the image, but it's a long way from the image that I saw in my mind when I took the photo, and that's my yardstick.
So, first things first: The first thing you should do when editing any RAW image is to apply the lens profile to correct any known lens issues (distortion, vignetting, etc.). You only need to do this for one image and then synch this correction across all three images - again a standard function in most software.

Once that's done, the three images should be opened as layers and then aligned to take into account slight shifts in the camera between images.

This is where the fun starts. I'm not sure what the best order is for the layers; whether light to dark or dark to light, in this case I've put the darkest on top. Now we have to tell the computer which parts of this image we want to use and which parts of the other images. To do this we need to use a function generally referred to as masking. Picture a scratch image that you have to rub with a coin to reveal what's underneath, that's what a mask is. We need to 'scratch off' or 'rub out' the parts of the top image that we don't want to keep. In ON1 Photo Raw the mask option for a layer is next to the layer ID. With a masking brush you can mask out (rub out) the parts of the image that you want to get rid of. For this level of masking I'll use a 25% Opacity with 100% Feather and paint out. As you paint out the darker parts of the image, the lighter parts of the layer below will begin to show through.

Looking at the resulting mask (Mask -> View) it looks a blotchy mess. White areas show the parts of the image that are kept and the black parts completely removed. And it's not just a black/white scale, grey-scales are reflected in the image too.

If I make the underlying layers transparent, you can see which parts of the top layer are maintained using this layer mask.

This process can be repeated for the middle layer to highlight the path, kind of like shining a light on it.
Once you've established which parts of which layer should be transparent, the layers can be merged to generate a single layer with the appropriate parts of each image selected for further editing.

As well as gently nudging the exposure up a bit, I've applied a Colo(u)r Enhancer: Colo(u)r Fall filter (global) and a Tone Enhancer: Tonal Contrast (selective mask) to the path to pick out the details. And that's the final edit.
Let me know if there are any other edit walkthroughs that you might be interested in.


Comments